I have integrated blogger into my home page. If you click an image to enlarge, simply hit the Backspace button to go back to the main page.
If you are using Opera then it may not load correctly. Thanks!
Hello everyone, here is my latest DIY for a windscreen / deadcat for your shotgun microphone. The best part is there is zero construction involved! How you ask? Well its simple, as I came up with the idea of using a furry seat belt pad as a windscreen itself. All for only $6.30 at Meijer. Now I did find one like this on amazon.com for about $6 in case you are unable to locate a local piece. Below I have a video demonstrating it on and off in high speed winds so you can hear the difference! I hope this becomes a popular alternative for some folks looking to film on the cheap. Please make sure to comment on the video with any questions. Thanks!
This video has also been posted on DIYPhotography.net, Cheesycam.com and lifehacker.com!
I have finally built it! Well for the most part anyways. (Pics below) I must still glue everything together and paint it black, but its together. Once I finish gluing the pieces and they dry, I will get out and do a test run to see how it performs. Maybe even go all out and create a dinky action short! Ha! But back to business... I have designed this rig to allow for multiple applications. With this you will be able to use it as a over the shoulder rig, but instead of some awkward one sided setup, it will put the camera directly in front of you and allow for easy adjustment of the focus ring. I have also made it possible to remove the shoulder handles/weights so it becomes a cage shaped fig rig. Allowing you to get your steering wheel shots. But not only that, since its a cage you will be able to turn your cage to the left or right and run along side your actor in a forward direction instead of having to side step. Assuming you have an oscillating screen or small mountable monitor...Or you are just that good and can run and "know" your actor is in frame ;). Now I do not have them myself, but if you so choose you could install rails as well and within the cage.
What are the benefits of a cage over just open on top? Well there are a number of them. With a cage you will be able to mount your shotgun and portable audio recorder in convenient places for yourself, and even lights! A cage will also give you the ability to add light deflectors for your lens on the front by simply attaching it to the front rods or do the mounting deck. Protection! If you drop your camera with other rigs, most likely your lens is sticking out beyond the rig it is attached to and will result in nearly instant destruction. But with this you will at least know that your camera is completely surrounded by pvc, which will take most of the punishment assumably with at least flat surfaces. Weather elements: Something I hope to test out, is making a rain over that will drape and attach over the cage with possibly a plexiglass window for shooting out and a large cover extending from that to protect the operator as well. I would love to actually be standing In the rain and snow and not have to worry about damaging my camera, yet getting cool weather shots.
Another little thing I added was the thread screw for the camera. I have created it so the screw will stay as part of the rig without falling out but you can turn it form the bottom instead of spinning your camera in circles to tighten it. Plus its really easy to attach with how its setup. You will see soon enough though how I did it. For now though, here are a few pics of the rig with my camera attached. Once I figure out what the best method is to glue the pieces together, I will record a video of the basic DIY portion so I may share it with the rest of you. My guess as to how much it will cost is kinda dependent on how far you yourself want to take it. But the very basic design should be just under $20 and that is without the weights attached and simply having pvc rods with foam rest on your shoulders. This is doable but may make you tired faster holding your camera and how much gear your attach. With everything I have it might be more like $35. Thanks for reading and feel free to share this post with others. I will do a second posting when I actually create the DIY video. Merry Christmas everyone!
So here in Michigan, or at least Northern Michigan there is a song that gets played around Halloween every year, simply called "The Legend" by Steve Cook. After man years of being on the radio it has finally been turned into a movie by Director Richard Brauer, titling it "Dogman." I was actually able to attend the opening event to this movie, which was a first for me and a great experience. Here below is the video I had captured of the red carpet event they had before heading inside.
While I was there I had the pleasure of meeting Benjamin Busch, who was secretly standing right behind me while I was taking pictures of inside the theater! He seemed like a great guy, and was very entertaining for the part he played as well. To bad I failed to mention my YouTube channel to him...But anywho, perhaps I will meet him again and maybe the others as well as my filming takes off and start to become a little more noticed.
For the movie I would say overall it was good, acting was great, there was just one thing that bugged me...Muzzle flashes! Rich, if you somehow read this, those bad boys need fixing. Other than that I found myself laughing half the time at the great humor of Larry Joe Cambell! Here is a few images I snapped while there as well.
Tom Cilluffo
Stacie Hadgikosti
After attending this event it definitely got me pumped about making my own movie! Time to start planning!
I have finally completed my latest little short. Just in time for Hallow....Christmas! :D Anyways, this was quite a task to complete. But first watch it, then read the rest below.
What made this so difficult was I had shot my actress and the rest of the short in two completely different locations, times, and with obviously different lighting scenarios. On top of that, I found myself trying to figure out how I would accomplish a few of the effects I did. Such as the faucet shutting off (harder then you would think it should have been), attempting to attach a reflection of the girl in the moving/tilting spoon, bloody drops/footprints, moving shadow on the wall, the ghost girls head spinning around, and attempting to mimic a falling shot. Anywho, I hope you enjoy it for the most part and feel free to share and subscribe! Thanks!
I have created and ordered my first real Krotoflik apparel, which is a nice black pullover. If you like this design and would truely buy something with this design on it, let me know! I have the opportunity to sell these if there was a demand for them. This current design cost me approximately $55 for being on a pullover, but can be simple enough to just have the front logo in any color on any of the manufactures product line for less than $20. I also ordered a long sleeve shirt for my wife with just the front logo and that came to $17. I will post again with images after I receive the products but until then, let me know what you think in the comments below!!!
If you haven't seen it already feel free to check it out! Gamer Girl Rage is my Doritos submission video for the 2012 Superbowl Ad spot . I have posted it on my YouTube channel and even have a direct link to the Doritos website for viewing! It would be of huge help if any one of you fine people checked it out on the Doritos site and left me a cheerful comment :) Please share as well by posting it to any one of you social pages as it would help a ton! Thanks for checking it out and hope I get a chuckle out of you! Doritos website: http://www.crashthesuperbowl.com/#/gallery?video=17323
Just wanted to publicly state, thanks to a couple kind peoples emails, I have found and fixed all the dead links to my downloadable Sony Vegas Pro 10 presets. So feel free to try and download any you wish, and it would be awesome if you were able to donate any dollar amount to my cause! Sadly I haven't received a single penny after hundreds of downloads, so it would make my day to see anything! :D Thanks and hope you enjoy them!
Updated: Hey guys and gals I have just finished up my latest short "Silo Assault!" So you know, this video was made with the intention of adding gun sounds. But after trying different things and sounds I felt the quality of the gun sounds did not match the video. So instead I made a decision to just have music.
Ok, here are some fun facts about this video: this is my second time ever using After Effects plus my first time ever using Action Essentials 2 (which I was kinda disappointed in the quality of the effects.) This was my first attempt at ever inserting a false background into a shot (Did you notice?) This video took me approximately 40 hours to make and it was shot within one hour while the sun was setting, so every shot kept changing. Half of the clips are 1600 ISO using a 50mm lens and even some 3200 ISO shots towards the end. Almost 90% of the shots taken were unusable due too...the guys not being able to hold back smiling. Haha. So in a sense I made this from scrap and made it work. On top of that, one of the guys had to leave ASAP because he was on call for his EMT job. So I then had to improvise...aka, killing him off.
One thing I will definitely need to build is a steadicam of some sort when using the 50mm. Doing action like this with blurred shots makes it very difficult to track motion, so some form of steadiness is good. The scene at the end with the building on fire was actually fully done up, but I decided that I liked the look of it blurred and I also liked the styling of the big after flash of the explosion.
Alrighty then, so I did some screen grabs from the short and have added them into this post so anyone who likes it enough can use it as a desktop wallpaper :) Also, as far as how I did the styling of the video, ever shot is different and I used my Deadwall and On the Run v1 presets together, but tweaked.
Hey everyone here is my latest preset from my action short "On the Run." This preset will most likely work with Sony Vegas Pro 10 only! Please consider donating...anything and make sure you are subscribed to my channel! Thanks and take care!
Just for something to compare to I applied this preset to a screen from my short "The Package."
Today I am happy to introduce my latest video, "On the Run." Its only just over a minute long, but it allowed me to use Adobe After Effects for the first time ever! I also had the opportunity to us the downloadable Bonus Pack from Action Essentials 2 as my only source of effects. Hope you enjoy this little short, and feel free to comment! Thanks!
I am sure some of you are happy to see me offering another preset for Sony Vegas Pro 10 up for free download (donations most welcome...heck you could be the first to do so!). I will go over a couple things about this preset and what you will discover with it as have I.
One thing about it is that its very flexible, you could apply it, open it up and un-check a single adjustment which could allow your shot to show more light in the scene or color. What I will say is that after I rendered out and uploaded my video with this preset, I started playing with the settings and I believe I could build a much more dynamic preset based off this one. Hopefully one that will give an even sharper look, a bit less dark, and show more details in the shadow areas. But you could certainly do that yourself with this one, you would just have to play with the settings. That's all for now, I hope you enjoy it and remember this is for Sony Vegas Pro 10.
Here is my latest video! It's my first stab at getting an action based film look and style shooting. I hope you like it and feel free to leave a comment and let me know what you think!
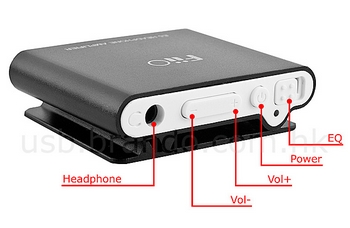
Hey everyone, I finally got around to making a video about reducing external microphone audio noise going into your Canon camera. Simply using the FiiO E3 or E5 can allow you to lower your gain internally on your camera, which then in turn lowers your hissing noise. Check it out to hear the comparison!
Updated..again: So I discovered after my rechargeable batteries arrived and were fully charged that the remote control doesn't work. Awesome...Tried new regular batteries with no success. So now I guess I will either be getting another one of these helicopters or a slightly different model. I hope whatever it is it at least works!
Updated: I am excited to show you guys a couple of new toys I got that I hope will allow me to capture some cool aerial footage! One of those toys is something I have been wanting to get for a little while now and that is the GoPro HD Hero Motorsports edition. Of course I hope to use this for more than just aerial shots, like for car driving and underwater shots as well, but aerial is something I have in mind for a short I would like to make. The other toy is supposed to be a DH 9053 Volitaion RC Helicopter. The reason I say is suppose to be is because I discovered the one I had received has different titling on the housing of the aircraft and came in a slightly different looking box. I contacted Team RC about this and they replied that it is the exact same thing as the original, its just in a different box...and they put there logo on it. Oh well, but here they are together!
Anywho, from what I have gathered this helicopter should indeed be able to carry and fly with the GoPro on board. Now from what I have read this helicopter should do alright outside on very very low windy days and there seems to be a lot of videos for modifications you can do to increase its performance. The hard part will probably be just figuring out how to fly the helicopter properly without crashes so I will have to practice flying before I go much further. The other interesting thing will be figuring out how I will mount the camera so I may reduce vibration and help eliminate any jello effect that could occur. But till then, look up GoPro and DH 9053 on youtube and you will find a couple of videos with them together.
So the music video is done and out for your viewing pleasure! A few things set this video apart from others and I will state them.
1. We shot all the video sequences before he even completed his song!
2. We shot everything in half of an afternoon, due to being rained out the day we were suppose to start. With that we had to come up with new ideas on where to shoot and what because a lot of our plans depended on being outside...
3. Garrett has no singing experience.
4. Garrett just started learning how to play the guitar.
5. I had no steadicam with me.
6. His vocals were recorded on a PC headset
But that's enough for now I think. Here is the video! Make sure to thumbs it up and share!
Some things to keep in mind if you go to create a music video: make sure the song is completed before shooting!, have a list of ideas written out on different cameras angles you would like to capture, decide if you will build a small story into the video, and make sure you bring everything you will need to shoot successfully. I used my Kronox camera slider on a few shots but sadly it was sitting on very tipsy sawhorses, so once the camera got half way across the track..."tip." But that's it for now, thanks for watching!
So something I have found myself doing as of recently was taking photos for some relatives of mine. Now I am by no means a professional photographer, but I do know how to work my magic on things I get my hands on. So in taking these pictures I have been receiving some pretty good feedback and am possibly thinking of starting my own small photography business...Well, more like side profession. Here are a few that I have done, and feel free to tell me what you think of them. Cheers. Click the images to Enlarge, and use the back button to get back to this screen.
Update: The friend who I am making the video for has just informed me of a snag on his end. So it will most likely be later than expected. Worst case scenario if things dont work out, I will just upload clips of shots we made to showcase what was done.
Well today I finished up shooting a music video for a friend. I think I got some cool shots and hope to compose them together to create a beautiful sequence of imagery. Since this was my first time shooting a music video and I just hope the video aspect turns out to the best of my ability. It will most likely be released after the beginning of September.
Hey everyone, here is a video I put together of the project I am working on. Transforming my sunroom into a video studio. It also has a few shots of some insects as well, enjoy!
Hey everyone I just wanted to let you know that the Magic Lantern firmware has finally arrived and working on the T3i / 600D. No, I have not used it myself yet, I still need to get my current camera squared away with Canon before I attempt to install it. But this is great news for us T3i / 600D owners! Here is the website for download and info: http://magiclantern.wikia.com/wiki/600D
Here is a video of someone testing a feature from magic lantern on their camera:
In case you haven't already heard, Google has created their own social setup that to me is superior to Facebook. It has better features without the bloated filling. If you already have a gmail account you should be able to activate Google+ and be on your happy way to adding friends into personal circles. Click here to check it out: https://plus.google.com/ Once you are setup just search for Krotoflik Films and place me in your desired circle of awesomeness!
Received my camera back from the repair facility at Canon after sending it there due to vertical lining in the video. When I opened the box the spec sheet said they cleaned it and removed a foreign object from the image sensor...Which is a total crock since I had inspected the sensor before I sent it. So now I will be calling them Monday and see what happens from there.
My real issue with these lines is that in the future I hope to create a movie I came up with and hopefully show it on a big screen somewhere, whether I pay to do so or not. Now for YouTube purposes it seems to do good, since its compressed so much that it almost eliminates the lines. But I am afraid that once the HQ video is blown up they will become quite apparent.
One of my current projects that has taken over is turning my sun-room into a small video studio. Yesterday I went out and bought more materials to complete the task and hope to get crackin' on it today when the sun comes out. In case you are one of those who is still waiting for my next Betrayer video to come out this is part of the reason it hasn't yet.
In the mean time I hope to come up with some clever videos as I have downloaded the trial version of Boris FX Continuum Complete 7. Just playing around with it and trying to figure out how things work, I could see some really cool effects being made from it. But I will keep you posted. Thanks for your patience.
Hello everyone, just wanted to share my latest video. Its some cool shots I happen to capture while I was at Asylum Lake. My wife had found one snake in a small stream and then next thing you know we discover there are three of them. All just chilling and cooling off on the hot day. Very neat! Here is the video I created of them and I also created another preset for download in my Sony Vegas Presets tab at the bottom. Cheers!
Hey guys and gals, just wanted to update you on whats going on. I have just mailed in my T3i to canon as I have discovered some vertical lines in my video. Now once I discovered said lines I realized they had been haunting my videos ever since I had the camera I just didn't realize they were there till recently. So hopefully I can get back to shooting stuff soon, but I do have some shots I had taken to play with and possibly create another preset from. Here is a couple screen captures to show you guys what I found.
Now in both cases I was using Technicolor CineStyle which really shows the lines but if your using the regular canon profiles then they can be harder to notice. Anyways, hopefully I am the only one with this issue. If you think you have this problem, post it below. Cheers.
Just thought I would let anyone know who is unaware of it but Vegas Pro 10.0e is out. Looks like it fixed some issues and added some more options. Here it is straight from their site:
Notable fixes/changes in Version 10.0e
Added support for LPCM audio in MVC files, 24p video in MVC files, and 50p/60p video in AVC files (e.g, such as from Sony HXR-NX3D1U camera).
Added support for reading Omneon Spectrum RDD9 MXF files.
Added support for creating IMX MXF files compatible with Sony eVTR deck.
The Burn Blu-ray Disc feature has been updated for compliance with the Blu-ray Disc specification. You can render 3D projects to a Blu-ray 3D Disc image file (.iso) from the timeline (Tools > Burn Disc > Blu-ray Disc). This feature is intended for commercial BD-ROM preparation testing.
Increased bit rate on built-in MVC templates and added 720-50p MVC template.
Fixed a crash that could occur when deleting events with OFX plug-ins.
Fixed a crash that could occur using Apply Non-Real-Time Event FX.
Fixed an issue that could cause incorrect colors for Windows Media Video (WMV) files in the 64-bit version of Vegas Pro.
Fixed an issue with thumbnails for some OFX plug-ins.
Fixed an issue editing Sony AVC/MVC templates in non-English versions of Vegas Pro.
Fixed an issue that prevented saving certain OFX presets.
Fixed an issue creating a Dynamic RAM Preview for OFX transitions.
Fixed an issue copy/pasting events with crossfades smaller than the audio quick-fade duration
Here is a little short I put together while I was at Asylum lake. I realized after I made it that I totally forgot to include the snakes in the water I shot. Maybe next time I guess, but here you go. This was in Kalamazoo MI.
On a side note, on my way to Kalamazoo my car caught on fire! I managed to put it out with Poweraid! W00t.
Update: The legs are complete, they are just sitting together at the moment. I'm currently deliberating how I will proceed to finish my design. It currently weighs 15 lbs. Just to get your hearts racing a little I am including a image I took of the quadpod standing up. Its low height is about 32 inches and I estimate it will be about 50 inches tall not including the rest of the tripod head mount or fluid head. Don't be fooled by the PVC you see, as I can confidently tell you each leg is rock solid with zero wiggle room. There is also more to this than the eye can see, but I will keep that my little secret until I make my DIY video once its finished. Let me know what you think in the comments below :). Cheers.
Well its almost here. My very own DIY quadpod. My estimates on its final specs would be that it could be capable of supporting 100lbs and weigh about 20lbs, but thats just a guess because it looks like an amazing freakin beast! I currently only have to assemble the last leg and from there final design tweaking. The last leg will take longer because I will be shooting my video while making it for the DIY.
If your wondering what is involved in the construction process you will be very glad to know that there is zero metal work involved! So anyone could technically make this. The tricky part might be getting the parts I used but I will get into that later. Estimated final cost, about $55. Oh yeah baby, oh yeah.
Update 7-4-11: I removed the mystery pex from the inside of the sliding platform. It works great without it! Also, something i tried is I applied "Armor All" original to the broom sticks and buffed it in really well. It now slides like it was on bearings. A simple 10 degree tilt at one end and it easily slides to the other. If I didn't know any better I would say its even quieter as well, very silent.
Update 7-3-11: Something I forgot to add is that my broom sticks have small grooves on the outside. I intentionally chose this because my theory is that the grooves will create less surface tension on the sliders and would create lens friction and therefor less noise. One other thing, in the top 90 degree elbows where the broom enters I had cut small pieces of the mystery pex (working on what exactly it is and will update) to simply give the broom less room to move.
Today I have the pleasure of introducing to you my latest DIY project, a camera slider. I call it KronoX with emphasis on the X for obvious reasons. This design will give you the combination of looking professional, lightweight frame, easy to build, and inexpensive all in the same package!
This puppy totals to approximately $22 and I purchased my PVC from Home Depot.
Cut sizes of PVC:
12 - 1 5/8 inch pieces
2 - 41 1/4 inch pieces
2 - 2 1/2 inch pieces
2 - 2 3/8 inch pieces
Other Parts:
2 - $1.75 broom's from family dollar (or somewhere with cheap brooms, lengths may vary and you will have to adjust the length of your two 3/4 inch long pieces of PVC.)
1 - eight pack of 1 inch sliding feet with sticky pads from Dollar Tree.
14 - 1 inch screws
1 - Cheap walmart cutting board.
Cut sizes of other parts:
1 - 6 inch x 6 inch poly cutting board piece
1 - 8 1/2 inch x 5 inch poly cutting board piece
2 - Cut broom sticks to final length of 42 1/4 inch
Optional:
-Poly fill
-1" thin wall pex, where ever you may find it. I would get the brooms first then bring the sticks in with you to make sure whatever you get the handle fits through the tube. The I.D. of the tube is 1" so this is why I call it so.
Tools required:
-Chop Saw Recommend (hand saw may work fine)
-Marker
-Tape Measure
-Screw driver
-Drill
-Small and Large drill bits
-Sand paper optional, but you might want some to take off edges.
Updated 9-23-2011: Here is the video I finally made with the comparisons on audio noise with and without these units, check it out!
Well I just ordered myself the FiiO E3 and E5 off Amazon. Totaling $30 free shipping. The E5 was $22.50 and the E3 was just $7.50. My hope is to test both in an attempt to remove audio noise / hiss while recording audio directly to my T3i from my HTDZ HT-320A shotgun mic. Which itself is just a cheap mic I picked up off of ebay for $32 free shipping from good ole China. Depending on what I find out after testing I will post a video outlining my results. Hope it works!
Hey guys, just wanted to post my latest video "Remorse." When we shot this it was done in a small cemetary. For my moving shots I actually set my camera on a bike seat and had my brother push the bike while I shot. It came out really wobbly due to only two tires and moving side to side. I might think about getting my hands on a couple trash bikes and joining them together for a smooth four tire rolling glide track sensation! Below I have posted some before and after images. Tell me what you think of them in the comments. Cheers!
Hey guys, Chad here. This is going to be a beta homepage for now. In an effort to update my website and load photos with ease, I have found a script that lets me insert a page in a page. So far I have noticed that if you click a picture that was uploaded it will enlarge it within the page. To get back to the regular home page without clicking the home tab just hit the Backspace key and your good to go. Let me know how you guys like the idea! Cheers.


